
An AI Face Scanner can be added to a beauty or skincare website without building a complete facial-analysis system from scratch. Skinive Face Scanner provides a ready-to-use Web Widget for the fastest implementation, alongside a Web SDK and API for businesses that need a more customized experience.
The basic Web Widget can be launched in around five minutes. More advanced implementations can use the Web SDK or API depending on the desired customer experience, development resources and surrounding website architecture.
Key Takeaways
- Skinive Face Scanner provides three current web integration options: Web Widget, Web SDK and API.
- The ready-to-use Web Widget is the fastest route and can be launched in around five minutes for the basic implementation.
- The Web Widget is appropriate when speed and low implementation effort are priorities.
- The Web SDK provides an option for more customized web implementations.
- The API provides an integration path for businesses building the Face Scanner into their own architecture.
- Skinive can work with a beauty brand or retailer’s own skincare catalog supplied through CSV or XML.
- Catalog synchronization is unlimited.
- Skinive dashboard analytics include scans, users, product clicks and sales conversions.
- Website integration should be evaluated as a complete customer journey rather than only as a technical embed.
What Does It Mean to Integrate an AI Face Scanner Into a Website?
Website integration means making AI-powered facial beauty analysis available inside a brand or retailer’s digital customer journey.
A customer can enter the Face Scanner from the website, capture the required facial views, receive beauty-focused analysis of supported visible cosmetic characteristics and continue toward relevant product discovery.
For a beauty e-commerce business, this creates a new route through the product catalog:
Website → Face Analysis → Beauty Insights → Relevant Product Discovery
The implementation can be relatively simple or more customized depending on the business.
A retailer that wants to launch quickly can begin with the ready-to-use Skinive Web Widget.
A business that needs a more customized web experience can evaluate the Web SDK or API.
What Are the Three Ways to Integrate Skinive Face Scanner?
Skinive currently provides three web integration approaches.
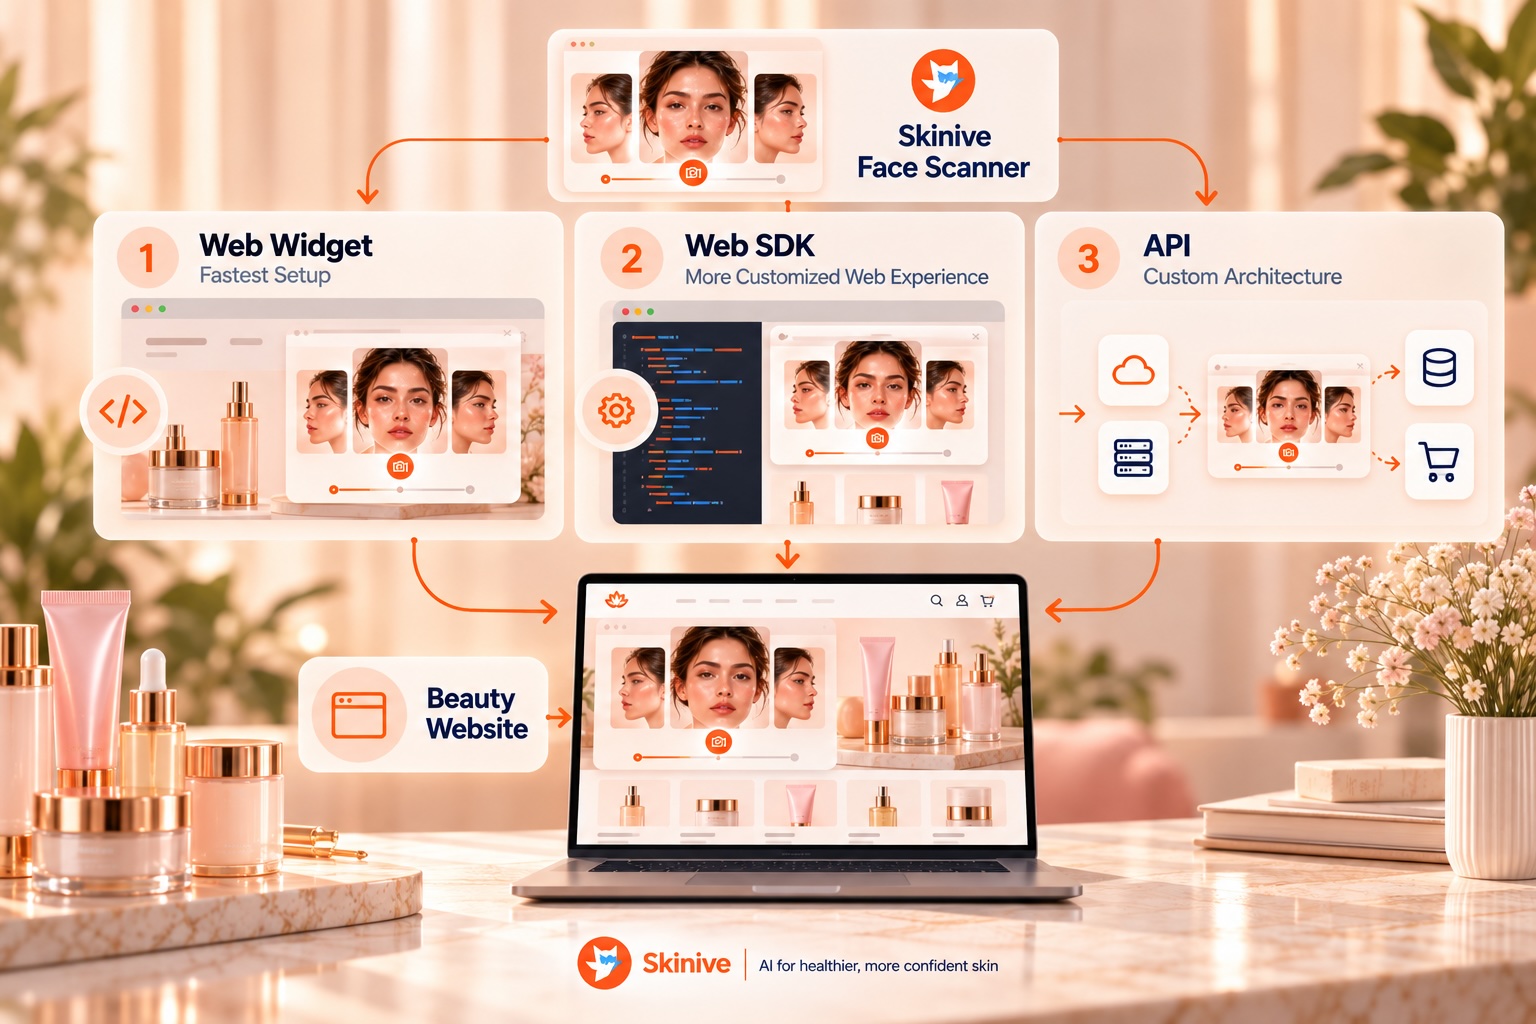
| Integration Method | Best Fit | Relative Implementation Effort | Customization |
|---|---|---|---|
| Web Widget | Fast launch and initial implementations | Lowest | Ready-to-use experience |
| Web SDK | More customized web experiences | Medium | Greater implementation flexibility |
| API | Custom application architecture | Highest | Greater architectural control |
These are different integration approaches for bringing Skinive Face Scanner into a customer experience.
The right starting point depends on how quickly the business wants to launch and how much control it needs over the surrounding experience.
Option 1: Ready-to-Use Web Widget
The Web Widget is the fastest way to bring Skinive Face Scanner to a website.
It is particularly relevant for businesses that want to launch an initial Face Scanner experience without first developing a custom implementation around the analysis technology.
The basic Widget implementation can be launched in around five minutes.
This makes it useful for:
- Initial website implementations
- Beauty e-commerce experiences
- Product-discovery journeys
- Proof-of-concept implementations
- Businesses that want to evaluate the customer experience before investing in deeper customization
The exact surrounding website work can still vary.
A production launch may require additional time for product-catalog preparation, placement decisions, analytics, customer-facing copy, testing, localization or internal review.
How Can You Launch the Web Widget?
The exact implementation should follow the current Skinive integration instructions, but the overall process is intentionally lightweight.
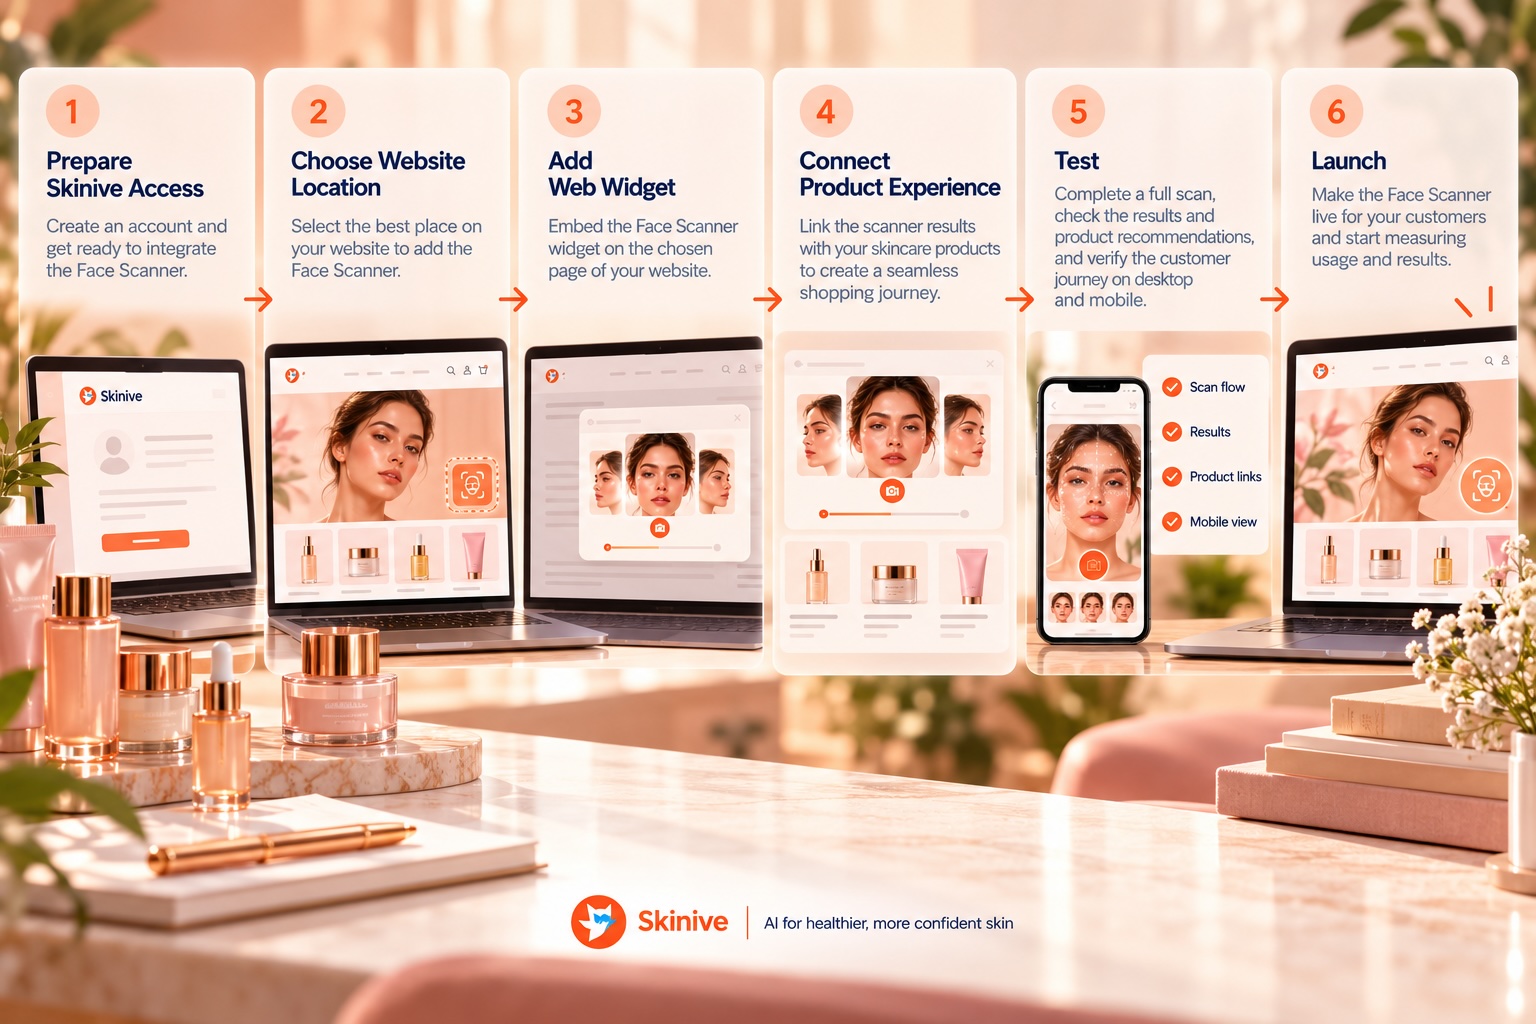
A practical implementation sequence is:
Prepare the Skinive Face Scanner Environment
Set up access to Skinive Face Scanner and the Web Widget implementation.
Choose the Website Location
Decide where customers should discover the Face Scanner.
Add the Widget
Implement the ready-to-use Web Widget on the selected website page according to the current Skinive integration instructions.
Connect the Product Experience
If product discovery is part of the journey, prepare the skincare catalog and relevant product destinations.
Test the Full Customer Flow
Complete the experience as a customer rather than verifying only that the Widget loads.
Test:
Entry → Face Capture → Beauty Results → Product Discovery → Product Destination
Launch and Measure
Once the experience works correctly, make it available to customers and monitor the resulting journey.
The technical embed is only one part of the implementation.
The surrounding customer experience determines whether visitors understand why they should use it and what they can do afterward.
Option 2: Web SDK for a More Customized Experience
The Web SDK is available for businesses that want more flexibility than a ready-to-use Widget.
It can be considered when Skinive Face Scanner needs to become part of a more customized web experience rather than functioning primarily as a ready-made component.
The Web SDK may therefore be relevant when a development team needs more control over how the Face Scanner fits into the surrounding website experience.
The specific implementation should be based on the capabilities documented for the current Skinive Web SDK rather than assuming functionality that has not been defined.
For businesses that primarily need a fast launch, the Web Widget remains the simpler starting point.
Option 3: API Integration
Skinive also provides an API.
An API integration is relevant when a business wants to incorporate Skinive Face Scanner into a broader custom technical architecture.
Compared with a ready-to-use Widget, this approach generally places more implementation responsibility on the business’s development team.
It can be appropriate for:
- Custom beauty platforms
- Larger digital products
- Businesses with their own application architecture
- Implementations where a ready-made Widget is not the desired customer experience
The API should not automatically be considered the “better” integration.
The appropriate method depends on the actual product and technical requirements.
Web Widget vs. Web SDK vs. API: Which Should You Choose?
Start with the simplest integration method that satisfies the customer and business requirements.
| If Your Priority Is… | Starting Point to Consider |
|---|---|
| Launch quickly | Web Widget |
| Minimize initial implementation effort | Web Widget |
| Test the Face Scanner customer journey | Web Widget |
| Build a more customized web experience | Web SDK |
| Integrate into a custom application architecture | API |
| Evaluate demand before deeper development | Web Widget |
A more complex implementation is not automatically more valuable.
For many beauty businesses, the practical approach is:
Launch → Measure → Learn → Customize when justified
This reduces the risk of building a large custom implementation before understanding how customers actually use the experience.
What Happens After a Customer Opens the Face Scanner?
Website integration should be designed around the complete customer journey.
A typical beauty experience can follow this sequence:
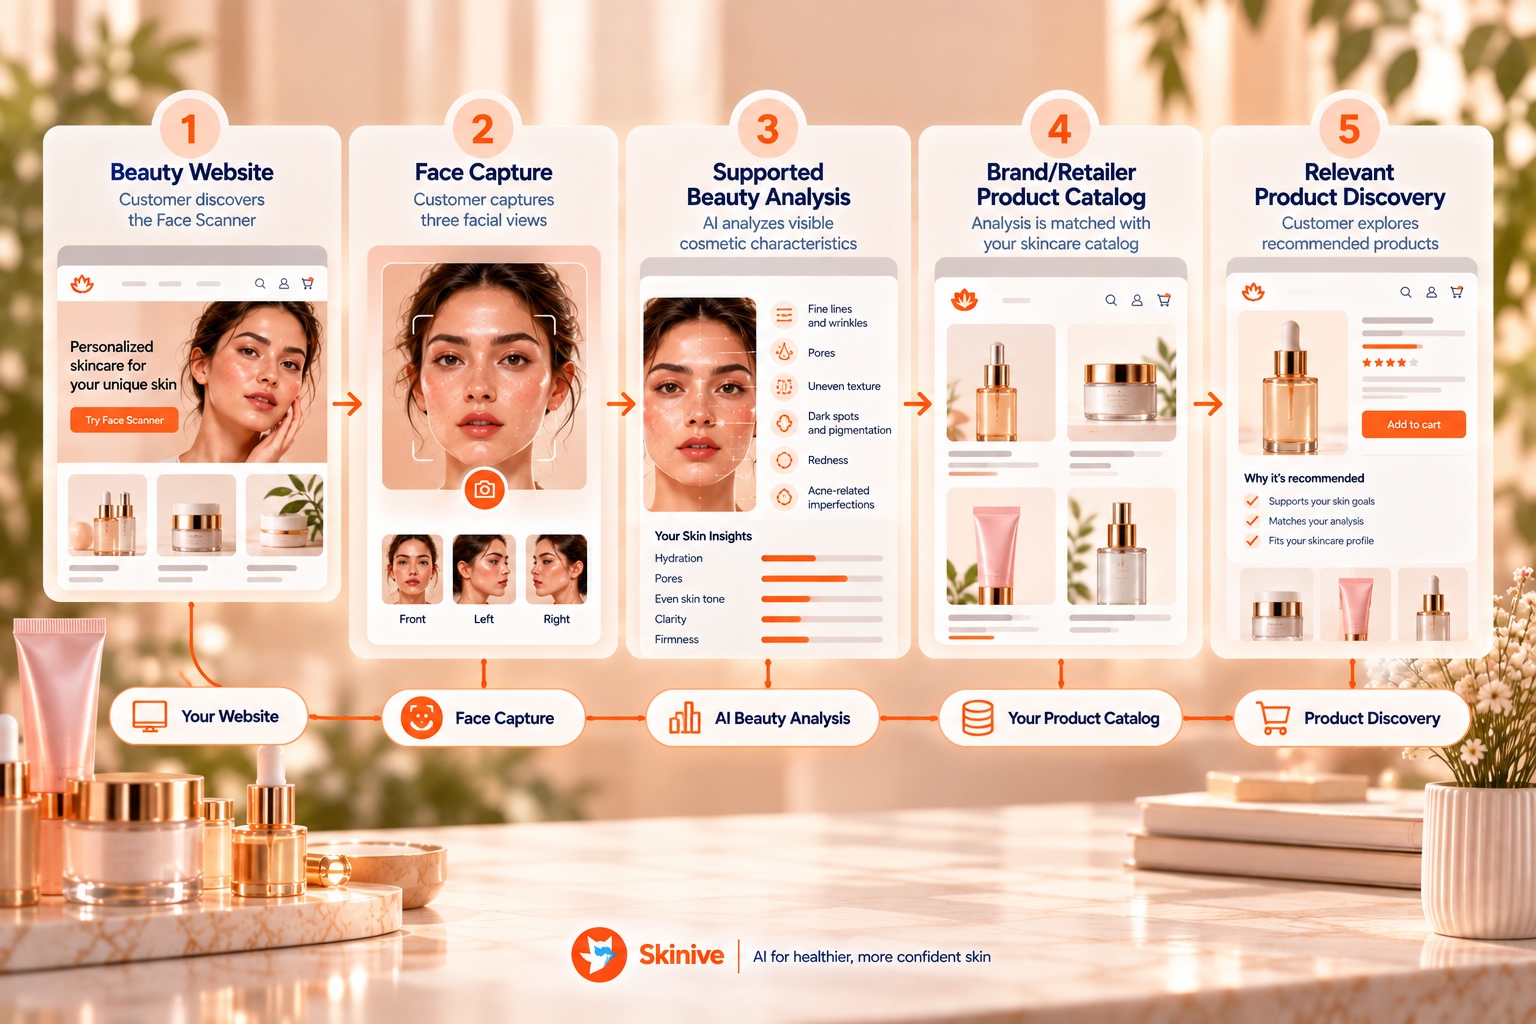
Enter the Face Scanner
The customer discovers the Face Scanner through an appropriate website entry point.
Capture Facial Views
Skinive Face Scanner uses front, left and right facial images.
Analyze Supported Beauty Characteristics
The AI analyzes the visible cosmetic characteristics supported by the system.
These can include concerns such as fine lines and wrinkles, pores, blackheads, whiteheads, acne-related imperfections, dark spots and pigmentation, redness and uneven-looking texture.
Present Beauty Insights
Results should be communicated in understandable cosmetic language.
Connect Insights With Products
Relevant beauty insights can contribute to product discovery using the retailer’s own skincare catalog.
Continue Shopping
The customer can continue toward relevant product pages and the surrounding commerce experience.
The Face Scanner should therefore not feel like an isolated interactive feature.
Its role is to help customers move from uncertainty toward relevant product discovery.
How Do You Connect the Face Scanner With Your Product Catalog?
Face analysis becomes more commercially useful when customers can move from beauty insights toward products the business actually sells.
Skinive Face Scanner can work with a beauty brand or retailer’s own skincare catalog.
Catalog data can be supplied through:
- CSV
- XML
Minimum product information includes:
- Product name
- Description
- Ingredients
- Price
- Product-page URL
Catalog synchronization is unlimited.
Current catalog limits depend on the plan.
| Plan | Catalog Size | Pricing |
|---|---|---|
| Starter | Up to 1,000 products | €99/month + €0.20 per scan |
| Growth | Up to 5,000 products | €199/month + €0.15 per scan |
| Enterprise | Custom | Custom |
The product-page URL is particularly important for e-commerce because it provides a destination for customers who want to continue exploring a relevant product.
For a deeper look at the recommendation layer, see AI Skincare Recommendations: From Face Analysis to the Right Products.
What Should Developers Prepare Before Integration?
A small amount of preparation can make implementation and testing more efficient.
Before starting, define:
- The website or staging environment
- The selected integration method
- The intended Face Scanner entry point
- The skincare catalog if product discovery will be used
- Valid product-page destinations
- Desktop and mobile testing requirements
- The surrounding customer journey
- Relevant website and commerce analytics
- Customer-facing privacy and consent requirements applicable to the implementation
The objective is to test more than whether the technology loads.
Developers should be able to follow the same path a real customer will experience from entry through product discovery.
Where Should You Place a Face Scanner on a Beauty Website?
Placement should reflect customer intent.
A Face Scanner can be made available at several points in a beauty e-commerce journey.
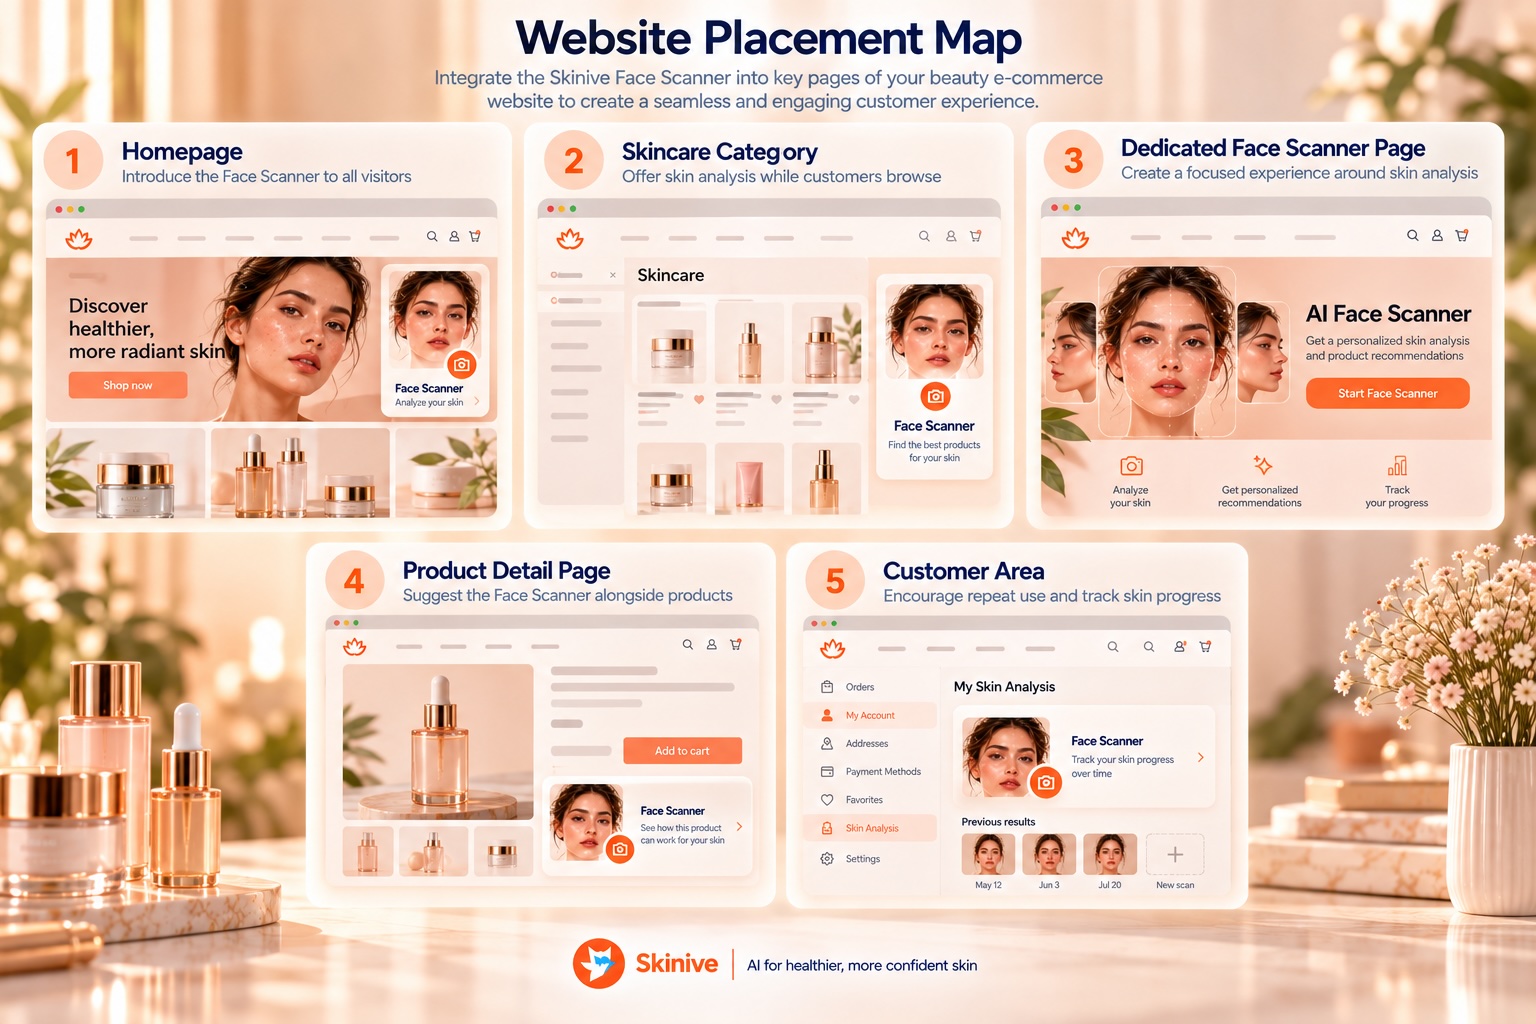
| Website Location | Potential Role |
|---|---|
| Homepage | Introduce personalized skincare discovery |
| Skincare category | Help customers navigate a large assortment |
| Dedicated Face Scanner page | Provide a focused analysis-to-product journey |
| Product-discovery experience | Add visual personalization to discovery |
| Product detail page | Offer personalization near a product decision |
| Customer area | Provide another entry point where appropriate |
| Campaign landing page | Build a dedicated Face Scanner journey |
There is no universally optimal placement.
A homepage may provide visibility, while a skincare category can capture stronger product-discovery intent.
A dedicated Face Scanner page can provide more room to explain the experience before requesting facial images.
Placement should therefore be tested rather than assumed.
For the broader e-commerce strategy, see AI Face Scanner for E-Commerce: How to Personalize Skincare Shopping.
How Should the Face Scanner Fit Into E-Commerce UX?
Technical integration alone does not create a useful customer experience.
Before customers begin, they should understand:
What is this?
Why should I use it?
What happens after the analysis?
A useful implementation should:
- Explain the customer benefit before capture begins
- Use clear Face Scanner entry points
- Keep capture guidance understandable
- Make the three-view process easy to follow
- Present results in beauty-focused language
- Provide a clear path toward relevant products
- Keep product destinations easy to reach
- Preserve normal website browsing
- Work effectively on mobile web
- Measure important customer drop-offs
The scanner should feel like part of the shopping journey rather than a technology demonstration.
Why Is Mobile Web Important?
Many customers will encounter a beauty website from a smartphone.
That makes mobile web an important environment for Face Scanner implementation and testing.
The experience should be tested across relevant mobile conditions, including:
- Face capture
- Browser behavior
- Page layout
- Navigation
- Results presentation
- Product links
- Return navigation
The purpose is not simply to make the desktop implementation smaller.
The complete Face Scanner journey should remain understandable and usable in a mobile browser.
How Should You Test the Integration Before Launch?
A pre-launch test should cover the complete customer journey.
Test the Integration
Verify that the selected Widget, Web SDK or API implementation operates as intended.
Complete the Three-View Capture
Run the front, left and right capture experience.
Test Mobile and Desktop
Verify the implementation in the website environments that customers will actually use.
Review Results Presentation
Confirm that the experience uses appropriate beauty-focused language and remains within the cosmetic scope.
Check Product Data
Verify the catalog information used by the experience.
Check Product Destinations
Open product links and confirm that they lead to the intended pages.
Review Navigation
Test entry, continuation, return and exit paths.
Review Analytics
Confirm that the business can measure the relevant website and commerce journey around the Face Scanner.
Review Privacy Communication
Check the customer-facing information required for the particular implementation and market.
Test as a New Customer
Run the journey without relying on developer knowledge of how it is supposed to work.
This often reveals UX problems that a purely technical test misses.
How Do You Measure Whether the Website Integration Works?
A working technical integration is not the same as a useful customer journey.
The Face Scanner can be evaluated as a funnel.
| Funnel Stage | Example Question |
|---|---|
| Discovery | Are customers finding the Face Scanner? |
| Start | Do visitors begin the experience? |
| Capture | Do customers complete the required facial views? |
| Results | Do customers reach and interact with results? |
| Product discovery | Do customers continue toward products? |
| Commerce | What happens after customers enter the shopping journey? |
Skinive’s dashboard includes:
- Scans
- Users
- Product clicks
- Sales conversions
Additional website and commerce metrics depend on the retailer’s own analytics environment.
The important principle is to identify where customers stop progressing rather than judging the implementation only by total scan volume.
The detailed CRO framework is covered in How AI Face Scanners Can Increase Conversion in Beauty E-Commerce.
Common Website Integration Mistakes
Several implementation mistakes can make a technically functional Face Scanner less useful.
Hiding the Entry Point
Customers cannot use a personalization feature they never discover.
Failing to Explain the Benefit
“Try our AI” is less informative than explaining what the customer can achieve with the experience.
Treating the Scan as the Destination
Customers need a useful next step after analysis.
Using Poor Product Data
Personalized discovery becomes less useful when the underlying catalog is incomplete or outdated.
Using Incorrect Product Destinations
Relevant recommendations lose value if product links do not lead customers to the correct commerce pages.
Building Too Much Too Early
A complex custom implementation can consume development resources before the business understands actual customer behavior.
Ignoring Mobile Web
An implementation that works only comfortably on desktop misses an important website environment.
Measuring Only Scans
Scan volume alone does not explain what customers do afterward.
Using Medical Language
Skinive Face Scanner belongs to beauty, cosmetics and personalized skincare. Website copy should not present it as a diagnostic tool.
Privacy and Customer Trust
Face Scanner integration involves facial images, so privacy considerations should be addressed as part of implementation rather than added as an afterthought.
Businesses should review the requirements applicable to their specific deployment, including customer communication and relevant consent, processing, storage, retention, security and privacy obligations.
The exact requirements can depend on the implementation and market.
Skinive Face Scanner should also be presented within its intended scope.
It is a beauty and cosmetics solution for personalized skincare experiences, not a medical diagnostic service or substitute for professional healthcare advice.
How Skinive Supports Website Integration
| Capability | Skinive Face Scanner |
|---|---|
| Fastest web integration | Ready-to-use Web Widget |
| Basic Widget launch | Around five minutes |
| Web SDK | Available |
| API | Available |
| Native iOS SDK | Planned |
| Native Android SDK | Planned |
| Face capture | Front, left and right facial images |
| Beauty analysis | Multiple supported visible cosmetic characteristics |
| Product catalog | CSV or XML |
| Minimum catalog data | Name, description, ingredients, price, product-page URL |
| Catalog synchronization | Unlimited |
| Dashboard analytics | Scans, users, product clicks, sales conversions |
| Support | Email and scheduled calls during working hours |
A Practical Rollout: Pilot First, Customize Second
A beauty business does not need to begin with the most complex possible implementation.
A practical rollout can follow a progressive path.
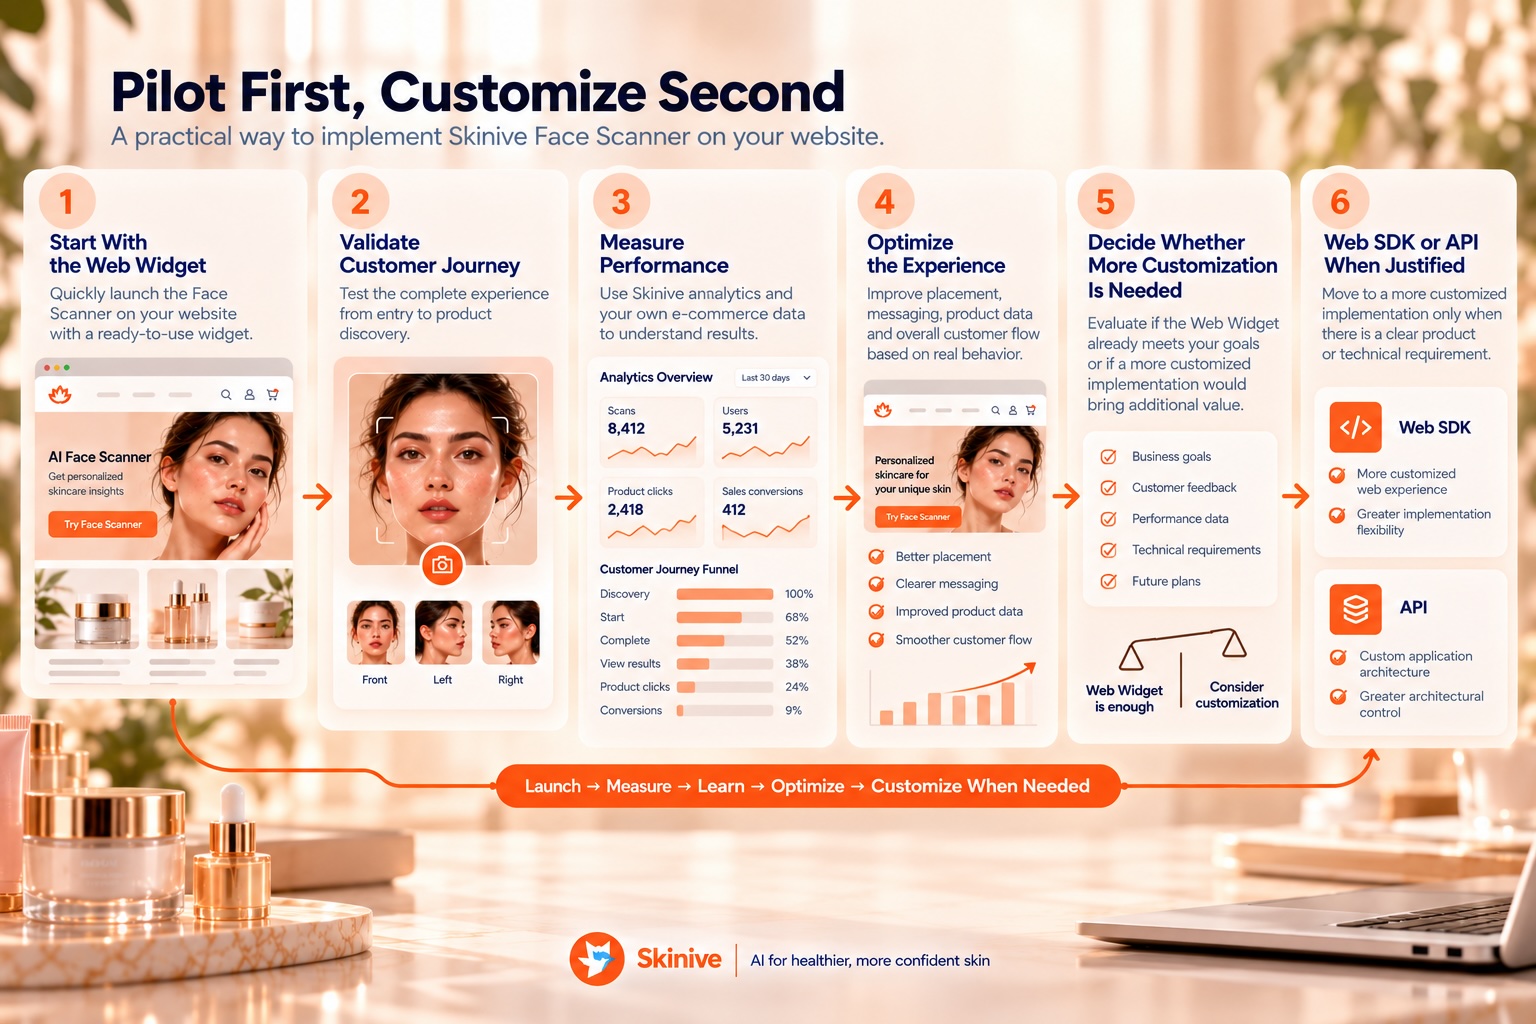
Start With the Web Widget
Use the ready-to-use implementation to establish the first working customer journey.
Connect a Representative Catalog
Make sure customers can move from beauty analysis toward products the business actually sells.
Test the Complete Journey
Evaluate the experience from entry through face capture, results and product discovery.
Measure Customer Behavior
Use Skinive analytics together with the business’s own website and commerce measurement where appropriate.
Optimize the Experience
Improve placement, messaging, capture guidance and the transition toward products based on observed behavior.
Decide Whether More Customization Is Needed
Determine whether the Web Widget already satisfies the business requirements or whether a more customized implementation would provide meaningful value.
Consider the Web SDK or API When Justified
Move toward deeper integration when there is a concrete product or technical requirement rather than complexity for its own sake.
The implementation principle is:
Web Widget → Validate Journey → Measure → Optimize → Customize When Needed
Related Resources
- AI Face Scanner for E-Commerce: How to Personalize Skincare Shopping
- AI Face Scanner for Beauty & Skincare Apps: Integration and Use Cases
- AI Face Scanner for In-Store Beauty Retail: Personalized Beauty Consultations at the Point of Sale
- AI Face Analysis: How It Works for Beauty & Skincare
- AI Skincare Recommendations: From Face Analysis to Relevant Products
- Personalized Skincare with AI: How Beauty Brands Can Move Beyond Generic Routines
- AI Product Recommendation Engine for Beauty and Skincare Brands
- How AI Face Scanners Can Increase Conversion in Beauty E-Commerce
- Omnichannel Beauty: One AI Face Scanner Across Web, App and In-Store
- Virtual Beauty Consultation: How AI Is Changing the Beauty Advisor Experience
- AI Face Scanner vs. Skin Quiz: Which Creates Better Skincare Personalization?
- What Can an AI Face Scanner Detect? Wrinkles, Pores, Blackheads, Dark Spots and More
- How to Connect a Cosmetics Product Catalog to AI Skincare Recommendations
- The Business Case for AI Beauty Technology: Conversion, Engagement and Customer Retention
Add AI Face Analysis to Your Website
Bring visual beauty personalization into your website using a ready-to-use Web Widget or build a more customized implementation with the available Web SDK or API.